 Autoclips
Create videos straight from Claude
Connect AutoClips to Claude once, then just ask it to make a video — Claude writes the script, generates the visuals and narration, renders it, and hands you the finished link. No credits are ever spent without your approval in chat.
Opens Claude with AutoClips filled in. Works on every Claude plan; on the Free plan Claude allows one custom connector.
On a Claude Team or Enterprise plan, an Owner adds it once for everyone: Add for my organization. Then each member clicks Connect and signs in with their own AutoClips account.
How it works
- 1
Click Add to Claude
Claude opens its Add custom connector box with the name AutoClips and our URL already filled in. Sign in to Claude if it asks, check the two fields, and click Add.
- 2
Approve access
Claude opens an AutoClips approval screen. Sign in if needed, review what's granted, and click Approve. That's it — you're connected. No API key to copy.
- 3
Ask Claude to make a video
Just describe what you want. Claude shows you the credit cost and waits for your OK before anything is charged.
"Make me a 1-minute video about the Bermuda Triangle with an energetic female narrator."
What Claude can do once connected
Create videos on your behalf — you approve the credit cost of every video in chat first
Publish finished videos to your connected social accounts — Claude shows you the caption and asks before anything goes live
See your credit balance and plan limits
See your narrator voices, including cloned voices
To disconnect, remove AutoClips under Settings → Connectors in Claude. Credits are only spent after you approve the cost in chat.
Prefer to add it by hand?
Use this URL in Claude's Add custom connector box.
https://app.autoclips.app/api/mcp- 1
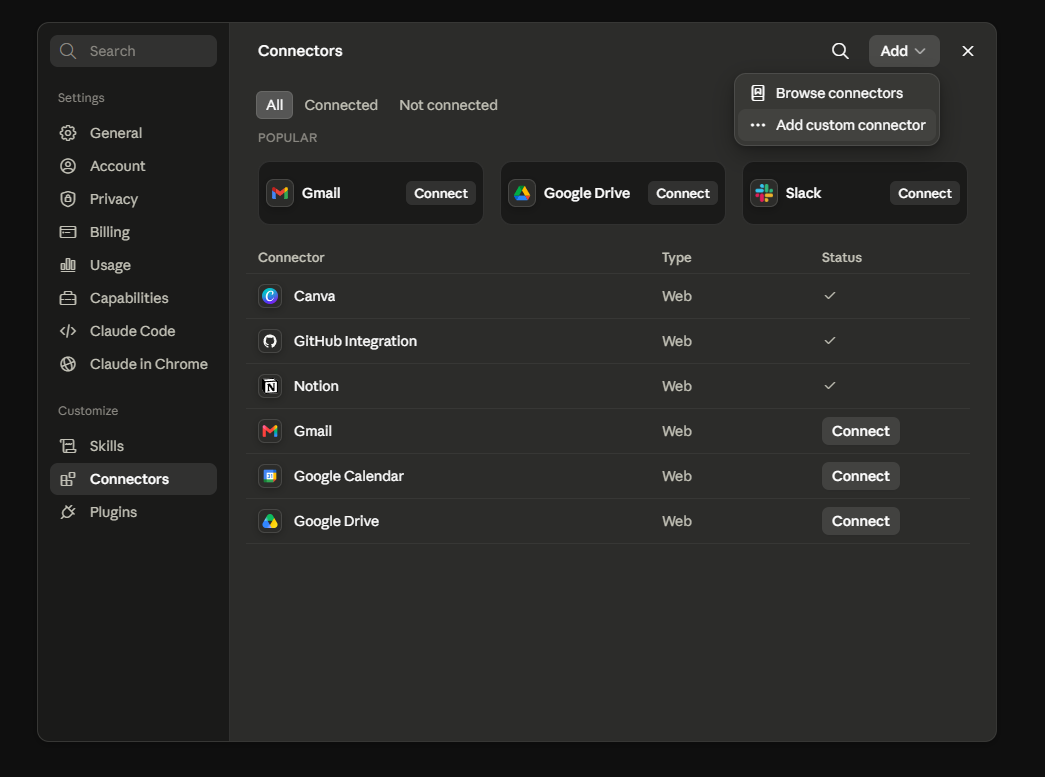
Open Connectors in Claude
In Claude, go to Settings → Connectors, click Add in the top right, then choose Add custom connector.
- 2
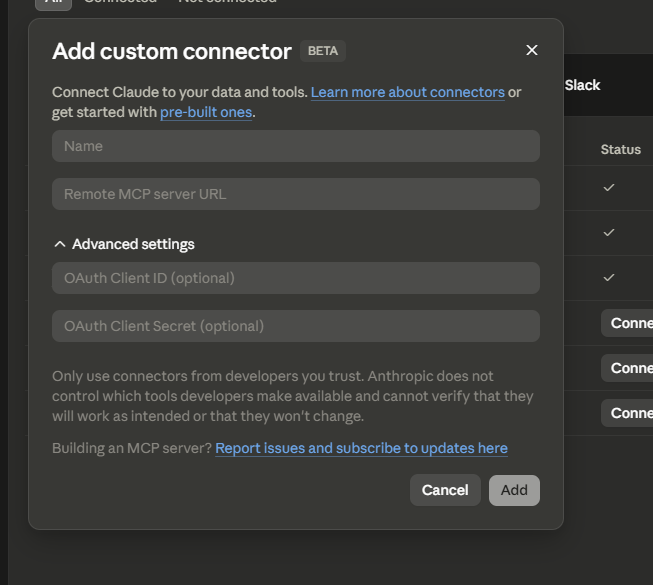
Paste the AutoClips URL
Give it a name (e.g. AutoClips) and paste the URL above into Remote MCP server URL. Leave the OAuth fields blank. Click Add, then approve on the AutoClips screen.
Claude Code
Run this once, then type /mcp in Claude Code to sign in.
claude mcp add --transport http autoclips https://app.autoclips.app/api/mcpCommon questions
Do I need an API key?
No. The connector uses a secure sign-in (OAuth) — you just click Approve. An API key is only for tools that cannot sign in that way, and you can generate one under Settings → Claude → Advanced.
Why doesn't the AutoClips connector show a logo like Notion or Canva?
Apps in Claude's own connector directory show their logo. A connector added by link or URL shows a generic "Custom" icon instead. It's cosmetic only; the connector works exactly the same.
Which Claude apps work?
Add it once on claude.ai or Claude Desktop and it works there, in Claude on mobile, and in Claude Code. Claude Code can also add it on its own with the command above.